It’s 2026 and it’s time you build your very own AI agent if you want to be on top of the game when it comes to automating your workflows or getting curated news headlines or even fetching the weather. You do not really need to rely on a third party for all these needs.
Today, we are going to talk about an incredible open-source, node-based workflow automation platform that will help you to just that and will even help you execute and automate tasks across different applications without writing code.
We are, of course, talking about n8n. We are first going to understand what this platform is and then we are going to find out how you can create your own AI agent with n8n.
What is n8n?

n8n is this open-source, node-based workflow automation platform that provides you with the benefit of visually designing, executing and most importantly automating different tasks across multiple applications and services without any complex code or, rather, any code in most situations.
It does this with the help of nodes, where you can basically drag and drop complex multi-step automations.
The benefit of a platform like this is that it is open source and will always help you have complete control of the automations, which you can inspect quite well and the platform provides a good balance between ease of use and minute control.
This makes n8n a perfect tool for non-technical users but then again, this can also be utilised by developers because of its level of control, and it can act as a bridge between your non-technical staff and your technical team, enabling you to create teams to automate processes across different systems.
So, How Do You Begin? Prerequisites
In order to begin this project, we are going to need to get some basics ready and these are:
n8n account/instance:
In order for the whole process to begin, you will need to sign up for a free n8n Cloud account or self-host n8n (e.g. via Docker).
Don’t worry, you are not going to be asked for credit card details.
API credentials:
Since you are actually not training the AI agent yourself, you will need the API keys for the agent and service you are going to use, like Google or OpenAI.
This will be treated as credentials and you need to save them in the credential manager of n8n and you can do your own due diligence for the kind of API you might need, whether you want to obtain weather data or mail data and your requirements.
Additional services:
If you are trying to put together an agent that might need to scrape websites or set up a headless browser, then that is also something you should consider.
Once we have these in place, we can now move on to the actual meat and bones or tofu.
Let’s Build the AI Agent With n8n
Create an n8n Account

- The very first thing you will need to do is visit the website n8n.io.
- After you have created the account, you need to log in and click on Workflows.
- Then, from Workflows to New Workflow to start a fresh canvas.

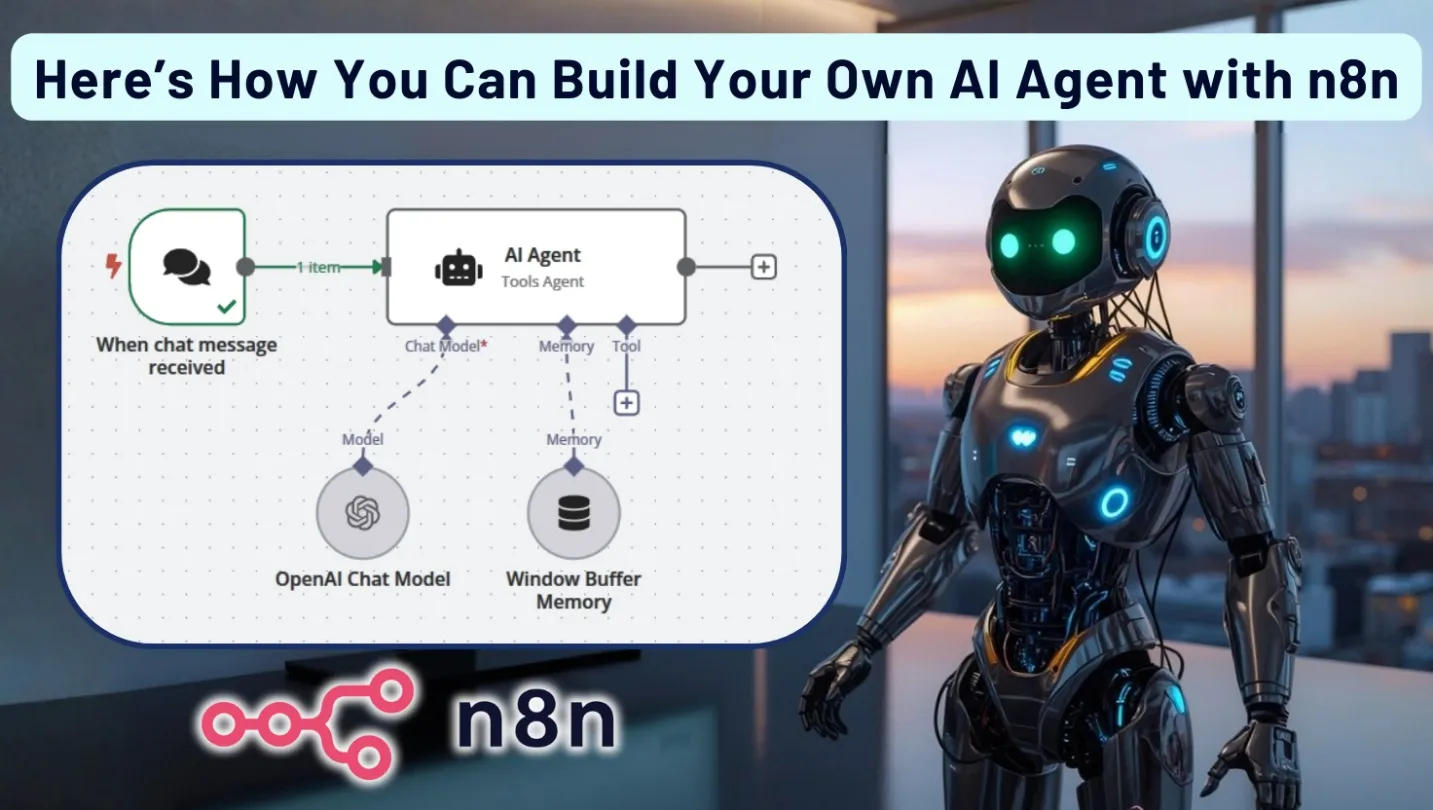
Alternatively, you can also import your own template, like the one attached above, by simply selecting Templates, then Build your first AI agent.
Once you are done with that, you must now provide a name to the workflow and we would suggest you name it in relation to the kind of agent it is, so that you can recognise it later. For example: Weather AI Agent, etc.
After you do that, this new Canvas is basically where you are going to build your agent by adding multiple nodes that are going to act as triggers, as well as AI, memory and tools.
Add a Trigger Node
Now that you have the Canvas all set, you need to create a starting point because every agent is going to need something to begin with that will trigger something else.
The best part is that in n8n, this automation-based activity is also called Trigger.
What you can do is simply search for AI Chat Trigger in the situation and add it to the workflow and this will help you with a simple chat UI and also a public URL, which you can utilise to send messages to your agent.
Alternatively, you can also use a Webhook Trigger for HTTP calls or a Slack/Discord Trigger to listen to messages in those apps as well.
Once you do that, you need to connect the Trigger node’s output to the rest of the workflow. You need to keep the URL in mind and how this works is when someone or you in this case, sends a message to that URL, it will trigger the workflow to run.
For now, you should leave the default settings of the Trigger as the same and we are going to feed its output into the AI agent node later on as the user’s input.
Add the AI Agent and LLM Nodes
Connect
Let’s start by dragging an AI Agent node to the canvas. Once you are done with that, you need to connect the Chat Trigger’s output to the AI Agent’s input. To do that, just visit the AI Agent’s settings and set Agent to “Tools Agent” (as this agent will use external tools) and set Source for Prompt (User Message) to the trigger node.
What this does is that it allows n8n to feed incoming chat messages into the agent and just makes things easier.
Add the AI Agent
Finally, it’s now time to add the language model node, which the agent will use and you simply need to drag your AI agent of choice as a node in the canvas.
This node is going to do all the work for you.
Two of the most popular options are Gemini and, of course, ChatGPT. If you plan on using Gemini, then you are going to need a Google Cloud key.
Choosing ChatGPT? You will need an OpenAI key.
System Message
It is now time that you instruct the agent and tell it what to do by setting its System Message. You can do that in the “System Message” field of the AI Agent node. Find it and enter clear instructions in clear English prompts.
Here’s an example.

Just keep in mind to be as clear and as explicit as possible about its role and when to use each tool, because if your prompt is good, then your agent’s responses will be very reliable and will guide the agent’s behaviour well.
Add Conversation Memory
Now that we are done with that work, it is time to give the agent the ability to remember earlier messages.
In order to do that, you will need to add a Memory node.
Find the AI Agent node’s small “Memory” icon and choose Simple Memory. This will help store the last few messages and will help with context (5 by default). We advise you to test it out.
Add Tool Nodes
We will now add tools that will actually make the AI agent do something for us.
Example
For example, if you want the agent to fetch the weather, add an HTTP Request node and rename it (e.g., get_weather).
Configure it for your weather API: set Method = GET and URL = https://api.open-meteo.com/v1/forecast with placeholders for parameters.
In your system prompt, describe this tool (e.g. “get_weather: Fetches current weather for a given city”). When the agent calls get_weather, it will use the parameters from its output to run this HTTP request.
Just like this, you can add as many tools as you want. For instance, you can add a YouTube node that will help you with channel stats and you can add a Gmail node or even a Strava node to get fitness activity data.
If it’s needed, then you can set up credentials for each tool node and connect to the AI Agent’s Tools input. If you do that, you should also list the tool’s name and description in the AI Agent settings, which helps the model know how to use it. Inside the tool nodes, use the special expression {{$fromAI(…)}} to get the agent’s output.
For example, if the agent outputs {“city”: “Paris”}, you might set the HTTP node’s URL parameter to https://…/forecast?city={{$fromAI(‘city’,’City name to fetch’) }}.
In this way, the agent can supply values to your API calls.
Save and Test Your Agent
We are almost done. Simply click Save and turn on the workflow toggle to Active.
Now comes the fun part, because this is when you get to test out the agent.
Remember the chat trigger URL? You should not copy it and simply open a browser on your smartphone and send it a question.
For example, “What is the weather in Paris today?” The agent will process the chat through the LLM and any tools you set up.
Once you do that, you need to inspect the execution log in n8n to find out if it has actually worked and for more details, you need to check the AI Agent node’s Logs tab.
You can also click on each node’s execution to see inputs and outputs and if, for some reason, something isn’t working (e.g. an API returns an error), then the best way to solve that is with the help of clues from the logs.
If you encounter search problems, you can simply adjust the workflow (prompts, tool configs, credentials) as needed and test this again until the agent behaves correctly.
Agent Expansion and Best Practices

Expand Your Agent
If you find that your agent is working properly, then it is just about experimentation and imagination because you can add more tools or even attach a knowledge base or vector store, which will allow the agent to fetch relevant documents.
Alternatively, you can also schedule event triggers or even set up multi-agent workflows and add notification nodes to send you alerts (although this is a little bit more complicated and increases the chances of errors quite a bit).
Tips and Best Practices
The possibilities with the system like this are enormous but you must keep a few things in mind.
- Make sure your prompts are clear and small and make sure they specify the role of the agent and tool names.
- Remember the Simple Memory node? It is set to 5 interactions by default. You might want to increase that limit if you want longer conversations to be remembered and better context understanding.
- Always keep API keys in n8n’s Credential Manager.
- Make sure to always refer to the logs if your agent brings up any errors.
- Try being an active part of the community and interact with the forum and blogs because it will help you out a lot.
- Always try improving things as you go along the way which might include little changes to the prompt or little changes to the names and descriptions, which will add up over time to improve workflow stability.
We hope this blog has been helpful for you to properly utilise n8n’s no-code interface and create something helpful for yourself.
n8n is the kind of bridge that will take over the future and be the connection between technical and non-technical teams.
However, this is still quite basic in terms of any enterprise-grade scale and no-code might not always be the best option for someone looking for more complex operations where nuance and experience are needed.
That is where we come in as Think To Share.
If you are someone looking to incorporate complex automation workflows within your existing systems or if you are looking to create entirely new systems with AI agents and cloud integration, then we are here for you.
We are one of the most renowned names in the industry when it comes to custom automation solutions and we would love to help you out with all your needs.
We welcome you to visit our website for more information.
